A large number of factors have been identified as causes of trigger point activation. These include acute or chronic overload of muscle tissue, disease, psychological distress, systemic inflammation, homeostatic imbalances, direct trauma, radiculopathy, infections, and lifestyle choices such as smoking. Trigger points form as a local contraction of muscle fibres in a muscle or bundle of muscle fibres. These can pull on ligaments and tendons associated with the muscle which can cause pain to be felt deep inside a joint. It is theorized that trigger points form from excessive release of acetylcholine causing sustained depolarization of muscle fibres. Trigger points present an abnormal biochemical composition with elevated levels of acetylcholine, noradrenaline and serotonin and a lower ph. The contracted fibres in a trigger point constricts blood supply to the area creating an energy crisis in the tissue that results in the production of sensitizing substances that interact with pain receptors producing pain. When trigger points are present in a muscle there is often pain and weakness in the associated structures. These pain patterns follow specific nerve pathways that have been well mapped to allow for accurate diagnosis or the causative pain factor.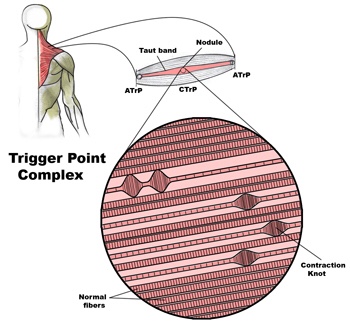
Low Back Pain
Diagnosis of trigger points.
Diagnosis of trigger points typically takes into account symptoms, pain patterns, and manual palpation. When palpating the therapist will feel for a taut band of muscle with a hard nodule within it. Often a local twitch response will be elicited by running a finger perpendicular to the muscle fibres direction. Pressure applied to the trigger point will often reproduce the pain complaint of the patient and the referral pattern of the trigger point. Often there is a heat differential in the local area of the trigger point. 
What is a trigger point
Dr Janet travel coined the term trigger point in 1942 to describe clinical findings with characteristics of pain related a discrete irritable point in muscle or fascia that was not caused by acute trauma, inflammation, degeneration, neoplasm or infection. The painful point can be palpated as a nodule or tight band in the muscle that can produce a local twitch response when stimulated. Palpation of the trigger point reproduces the pain and symptoms of the patient and the pain radiates in a predictable referral pattern specific to the muscle harbouring the trigger point.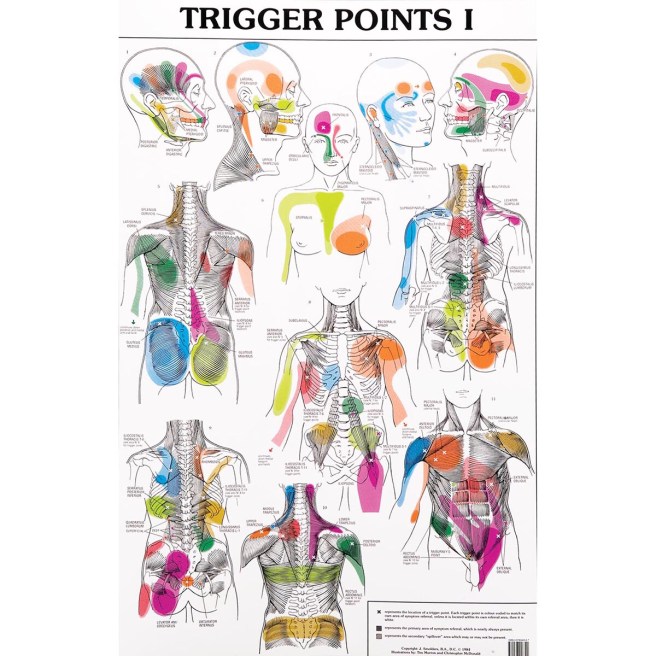
Snapping Hip. Not as horrific as it sounds.
The muscle responsible for flexing your hip toward your trunk, is called the Psoas. This muscle begins on your lower spine and passes through your pelvis to attach onto the top of your femur (thigh bone). Along this course, the muscle travels across the front of your hip socket and over several bony prominences. If the muscle is too tight, its tendon may rub over these “bumps”. This occasionally produces an audible snapping sound, hence the moniker, “snapping hip”, aka “psoas tendinopathy”.
 The tendon can be irritated by an acute injury, but more commonly from overuse- particularly repeatedly flexing your hip toward your trunk. The condition is also known as “dancer’s hip” or “jumper’s hip”, as movements associated with these activities are known culprits. Likewise, the condition is frequently seen in athletes who participate in rowing, track and field, hurdling, running (especially uphill), soccer, and gymnastics.
Your symptoms may include a “snapping” sound or sensation when you flex and extend your hip- although many cases are silent. Repeated rubbing causes inflammation and subsequent deep groin pain that can radiate to the front of your hip or thigh. Long-standing problems can trigger weakness or even limping.
The diagnosis of snapping hip is frequently overlooked. In fact, some studies show that identification is often delayed more than two years, while other potential causes are pursued. Fortunately, your problem has been recognized, and our office has several treatments to help you recover.
Psoas problems often start when one group of muscles is too tight, while another is too loose. Your home exercises will help to correct this problem. Depending upon the severity of your condition, you may need to avoid certain activities for a while. You should especially avoid repetitive hip flexion. Prolonged seated positions can encourage shortening of your hip flexors so be sure to take frequent breaks. Patients with fallen arches may benefit from arch supports.
What to expect with a trigger point massage.
A treatment with Bryan is very user friendly. And, no, you don’t have to remove any clothing. However, bringing a t-shirt and a pair of shorts or sweats is recommended.

The first time you come for a treatment you will be asked to fill out a Client History form. Bryan will go over the information you provide, asking for more detail and discussing the type of pain you are having and its location.
The treatment itself involves locating the Trigger Points in the muscle or soft tissue and applying a deep focused pressure to the Point. This will reproduce the pain and the referral pattern that is characteristic of that pain.
The treatment will be uncomfortable at first, but as the Trigger Points release, the pain will decrease. The pressure will always be adjusted to your tolerance level. If, at any time, you feel too uncomfortable you can ask Bryan to ease off a bit.
Depending on your specific problem, Bryan may also use some stretching and / or range-of-motion techniques, as needed.
After treatment, it is usually recommended that the client apply moist heat to the area treated.
The Bird Dog

Today we are going to look at one of the most effective exercises to protect your lumbar spine from discogenic injury, the bird dog. A great way to work on both posterior chain and rotational stability, the bird dog is safe, effective and simple.
- Get on your hands and knees (four point position) with your knees and hands, hip and shoulders width apart.
- Your back is in neutral position (slightly arched) and your chin must be tucked in.
- Activate your lower abdominals (transversus abdomini) by bringing your belly button inward and by activating your pelvic floor muscles 20 to 30% of maximal contraction.
- Maintain a steady abdominal breathing while you simultaneously lift one leg backwards and the opposite arm overhead keeping your back in neutral position.
- Return to the initial position and repeat with the other leg and arm.
2 sets of 10 reps as part of your regular core/stability routine will have you well on your way to a life-proof low back!
Image and instructions from physiotec.ca
Lumbar Spine Stabilization

This is a great way to increase the stability of your lower back.
- Lie with your stomach over a therapeutic ball while stabilizing yourself with your feet and arms and keep your head in line with your body.
- Tighten your abdominal muscles to flatten the spine by pulling your belly button towards your back and hold the contraction throughout the exercise.
- Bend one knee and lift it up towards the ceiling.
- Lower the leg and repeat on the other side.
Our Exercise Of The Month: Dead Bug
Begin lying on your back with your right arm reaching overhead and your left leg flat on the table. Your right knee should be bent 90 degrees and your hip 45 degrees. Place your left wrist beneath your back to prevent your back from flattening against the ground. Slowly begin by raising your left knee and right arm at the same time until your hand touches your knee. Be sure not to lift your head or allow your spine to flatten against the floor. Return to the start position and repeat for three sets of 10 repetitions on each side, twice per day or as directed.
When Are My Shoes “Done”?

Running shoes need to be replaced every 250 miles. There are three basic options:
✓ Motion Control Shoes – Designed for people with low or no arches, these shoes are for runners who strike the ground on the outer edge of their foot. Avoid overly stiff shoes as these decrease you perception of ground strike and lead to new injuries.
✓ Stability or Neutral Shoes – Designed for people with normal or average arches and running mechanics. The shoe contains some cushioning to absorb shock and prevent injuries and some rigidity to avoid pronation.
✓ Cushioned Shoes – Designed for people with high arched feet. Their footprint will typically leave a thin band along the foot’s edge. As they run weight is distributed from heel strike to the outer edge of the foot and small toes that bear the brunt of “lift off.” This shoe is more flexible and absorbs the shock created by the lack or rotation (under-pronation) created by their running style.
Entering & Exiting Your Vehicle

Entering and exiting your vehicle is a potential risky activity for low back pain sufferers. Follow these tips to limit problems:
✓ To enter the vehicle, open the door and stand with your back to the seat, legs close to the side of the vehicle. For larger vehicles, you may wish to begin by standing on the running board. Place your hands on the door and door frame to keep your movements slow and controlled then slowly lower your body into the vehicle.
✓ Tuck your head into the vehicle. Keep your knees close to each other, as though they have been taped together, brace your abdomen as though you are about to be punched in the stomach and pivot your body as a whole without twisting or bending at the waist. You may grasp the steering wheel with your right hand to help you pivot.
✓ Use a lumbar roll or other support to help maintain good posture. Position the roll slightly above your belt to support the “small of your back”. Adjust your seat so that your knees are slightly lower than your hips. Try to avoid prolonged car rides- take frequent breaks.
✓ Before exiting, create adequate space by pushing your vehicle seat back as far as possible and move the steering wheel up and out of the way. To exit, first scoot slightly to the door side edge of your seat, then keep your knees together and pivot with the same cautions that you used to enter the vehicle. When your feet are shoulder width apart and firmly on the ground or running board, grasp the door and door frame, lean forward, but be sure not to bend your back, as you tighten your abdominal muscles. Slowly thrust your hips forward to stand up.
