The Bird Dog

Bird Dog

Today we are going to look at one of the most effective exercises to protect your lumbar spine from discogenic injury, the bird dog. A great way to work on both posterior chain and rotational stability, the bird dog is safe, effective and simple.

  • Get on your hands and knees (four point position) with your knees and hands, hip and shoulders width apart.
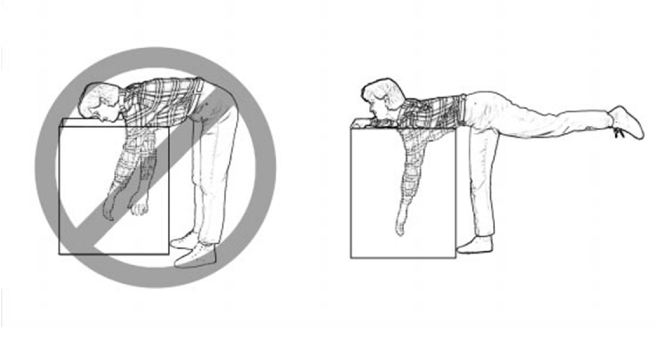
  • Your back is in neutral position (slightly arched) and your chin must be tucked in.
  • Activate your lower abdominals (transversus abdomini) by bringing your belly button inward and by activating your pelvic floor muscles 20 to 30% of maximal contraction.
  • Maintain a steady abdominal breathing while you simultaneously lift one leg backwards and the opposite arm overhead keeping your back in neutral position.
  • Return to the initial position and repeat with the other leg and arm.

2 sets of 10 reps as part of your regular core/stability routine will have you well on your way to a life-proof low back!

Image and instructions from physiotec.ca 

Lumbar Spine Stabilization

L Spine Stabilization

This is a great way to increase the stability of your lower back.

  1. Lie with your stomach over a therapeutic ball while stabilizing yourself with your feet and arms and keep your head in line with your body.
  2. Tighten your abdominal muscles to flatten the spine by pulling your belly button towards your back and hold the contraction throughout the exercise.
  3. Bend one knee and lift it up towards the ceiling.
  4. Lower the leg and repeat on the other side.


Our Exercise Of The Month: Dead Bug

Begin lying on your back with your right arm reaching overhead and your left leg flat on the table. Your right knee should be bent 90 degrees and your hip 45 degrees. Place your left wrist beneath your back to prevent your back from flattening against the ground. Slowly begin by raising your left knee and right arm at the same time until your hand touches your knee. Be sure not to lift your head or allow your spine to flatten against the floor. Return to the start position and repeat for three sets of 10 repetitions on each side, twice per day or as directed.

When Are My Shoes “Done”?

168

Running shoes need to be replaced every 250 miles. There are three basic options:


Motion Control Shoes – Designed for people with low or no arches, these shoes are for runners who strike the ground on the outer edge of their foot. Avoid overly stiff shoes as these decrease you perception of ground strike and lead to new injuries.


Stability or Neutral Shoes – Designed for people with normal or average arches and running mechanics. The shoe contains some cushioning to absorb shock and prevent injuries and some rigidity to avoid pronation.


Cushioned Shoes – Designed for people with high arched feet. Their footprint will typically leave a thin band along the foot’s edge. As they run weight is distributed from heel strike to the outer edge of the foot and small toes that bear the brunt of “lift off.” This shoe is more flexible and absorbs the shock created by the lack or rotation (under-pronation) created by their running style.

Entering & Exiting Your Vehicle

Ferrari_599_from_Lusso

Entering and exiting your vehicle is a potential risky activity for low back pain sufferers. Follow these tips to limit problems:


To enter the vehicle, open the door and stand with your back to the seat, legs close to the side of the vehicle. For larger vehicles, you may wish to begin by standing on the running board. Place your hands on the door and door frame to keep your movements slow and controlled then slowly lower your body into the vehicle.

Tuck your head into the vehicle. Keep your knees close to each other, as though they have been taped together, brace your abdomen as though you are about to be punched in the stomach and pivot your body as a whole without twisting or bending at the waist. You may grasp the steering wheel with your right hand to help you pivot.

Use a lumbar roll or other support to help maintain good posture. Position the roll slightly above your belt to support the “small of your back”. Adjust your seat so that your knees are slightly lower than your hips. Try to avoid prolonged car rides- take frequent breaks.

Before exiting, create adequate space by pushing your vehicle seat back as far as possible and move the steering wheel up and out of the way. To exit, first scoot slightly to the door side edge of your seat, then keep your knees together and pivot with the same cautions that you used to enter the vehicle. When your feet are shoulder width apart and firmly on the ground or running board, grasp the door and door frame, lean forward, but be sure not to bend your back, as you tighten your abdominal muscles. Slowly thrust your hips forward to stand up.

My back hurts, why look at my feet?

168

Improperly supported feet can affect the alignment of all of the structures above. To improve your overall comfort:
Choose shoes with good arch support.
Avoid going barefoot or wearing shoes that lack support (i.e. flip-flops). The following brands of sandals provide better than average arch support: Naot, Fit Flops, Orthoheels, Abeo, Vionic and Yellow box.
Avoid high-heeled shoes or boots (keep heels to a maximum of 1½ inches, especially if you are going to be doing a lot of walking).
“Cross-trainer” athletic shoes tend to provide the best all around support and shock absorption for daily activities.
Patients with fallen arches should consider adding arch supports or orthotics.
Repair or replace shoes with worn soles or heels.

Lifting Mechanics Made Simple

boxes

Here are some tips to help you lift safely:
Avoid lifting or flexing before you’ve had the chance to warm up your muscles (especially when you first awaken or after sitting or stooping for a period of time).
To lift, stand close directly facing object with your feet shoulder width apart.
Squat down by bending with your knees, not your back. Imagine a fluorescent light tube strapped to your head and hips when bending. Don’t “break” the tube with improper movements. Tuck your chin to help keep your spine aligned.
Slowly lift by thrusting your hips forward while straightening your legs.
Keep the object close to your body, within your powerzone” between your hips and chest. Do not twist your body, if you must turn while carrying an object, reposition your feet, not your torso.

An alternative lifting technique for smaller objects is the golfers lift. Swing one leg directly behind you. Keep your back straight while your body leans forward. Placing one hand on your thigh or a sturdy object may help.

LIFTING-5.png

A Few Sleep Tips From Us To You

276

Your mattress and the position you sleep in may affect your spine.

Choose a mattress that provides medium or firm support, such as a traditional coil spring or adjustable airbed. Avoid waterbeds, thick pillow tops and soft, sagging mattresses.
Always sleep on your back with a pillow either underneath your knees or on your side with a pillow between your knees. Avoid sleeping on your stomach.
Keep your neck and back covered while sleeping to avoid drafts that could cause potential muscle spasms.

Here are a couple of tips to help you get in and out of bed more comfortably:
To lie down: Sit on the edge of the bed, pull your arms to your sides and tilt your body into the bed, maintaining the bend of your knees at 45 degrees. Finally, bring your feet into in a lying position or roll onto your back.
To get up: From a side-lying position with your knees bent, push your body upright into a sitting position, swinging your legs over the edge of the bed as you rise.

If you find that you wake up sore then you may be suffering from any number of conditions that get worse overnight.

Workstation Ergonomics

262

Ergonomics is the science of adjusting your workstation to minimize strain in the following ways:

Maintain proper body position and alignment while sitting at your desk – Hips, knees and elbows at 90 degrees, shoulders relaxed, feet flat on floor or footrest.
Wrists should not be bent while at the keyboard. Forearms and wrists should not be leaning on a hard edge.
Use audio equipment that keeps you from bending your neck (i.e., Bluetooth, speakerphones, headsets).
Monitors should be visible without leaning or straining and the top line of type should be 15 degrees below eye level.
Use a lumber roll for lower back support.
Avoid sitting on anything that would create an imbalance or uneven pressure (like your wallet).
Take a 10-second break every 20 minutes: Micro activities include: standing, walking, or moving your head in a “plus sign” fashion.
Periodically, perform the “Brugger relief position” (See video below) -Position your body at the chair’s edge, feet pointed outward. Weight should be on your legs and your abdomen should be relaxed. Tilt your pelvis forward, lift your sternum, arch your back, drop your arms, and roll out your palms while squeezing your shoulders together. Take a few deep cleansing breaths.

How can I reduce stress on my spine while standing?

STress

To avoid extra stress on your spine while standing:

Avoid high-heeled shoes or boots

Use a footrest measuring 10% of your height

To decrease stress on your back and feet consider leaning on a tall chair.

If excessive standing can’t be avoided, consider shock-absorbent shoes or an anti-fatigue mat.

When transitioning from a sitting workstation to a standing desk, begin gradually by standing 20 minutes per hour and not necessarily in a continuous period. Add an extra 10 minutes per hour each day as long as there is no prolonged stiffness or discomfort.