Our Condition of the Month: ITB Syndrome

Iliotibial Band Syndrome

Your iliotibial band is a fibrous band of tissue running from the crest of your hip, down to your knee. A muscle near the crest of your hip called the tensor fascia lata, attaches to this band to help control movements of your leg. Your iliotibial band passes over the point of your hip and over another bony bump on the outside of your knee called the lateral epicondyle. When the band is too tight, it can become painfully inflamed as it repeatedly rubs over the top of either of these bony projections. Irritation at the bony bump near the knee is called iliotibial band friction syndrome.

The condition usually presents as pain on the outside of your knee that becomes worse with repetitive knee flexion or extension. This condition is the leading cause of lateral knee pain in runners, especially slower “joggers.” The pain usually develops 10-15 minutes into the workout. You may sometimes feel or hear a click during movement. Symptoms generally ease at rest. Running on slick “wintry” surfaces may aggravate the condition. Excessively worn running shoes may be a culprit.

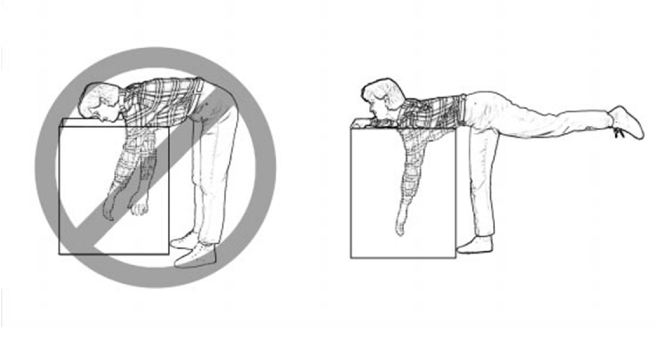
This problem is commonly caused by weakness in your gluteal muscles. When these muscles are weak, the muscle that attaches to your iliotibial band must contract harder to stabilize your hip. Having one leg longer than another is a known aggravating factor.

Runners should minimize downhill running and avoid running on a banked surface like the crown of a road or indoor track, as well as wet or icy surfaces. Runners should reverse directions on a circular track at least each mile. Bicyclists may need to adjust seat height and avoid “toe in” pedal positions. Avoid using stair climbers or performing squats and dead lifts. Sports cream and home ice massage may provide some relief of symptoms.

Lifting Mechanics Made Simple

boxes

Here are some tips to help you lift safely:
Avoid lifting or flexing before you’ve had the chance to warm up your muscles (especially when you first awaken or after sitting or stooping for a period of time).
To lift, stand close directly facing object with your feet shoulder width apart.
Squat down by bending with your knees, not your back. Imagine a fluorescent light tube strapped to your head and hips when bending. Don’t “break” the tube with improper movements. Tuck your chin to help keep your spine aligned.
Slowly lift by thrusting your hips forward while straightening your legs.
Keep the object close to your body, within your powerzone” between your hips and chest. Do not twist your body, if you must turn while carrying an object, reposition your feet, not your torso.

An alternative lifting technique for smaller objects is the golfers lift. Swing one leg directly behind you. Keep your back straight while your body leans forward. Placing one hand on your thigh or a sturdy object may help.

LIFTING-5.png

Hip Abductor Weakness

Hip Abduction

* The gluteus medius contributes approximately 70% of the abduction force required to maintain pelvic leveling during single leg stance.

* Hip abductor strength is the single greatest contributor to lower extremity frontal plain alignment during activity.

* There is no “typical” presentation for hip abductor weakness, but the problem must be considered in any patient with lower chain symptomatology, particularly those with hip tendinopathy, greater trochanteric pain syndrome, iliotibial band syndrome, patellofemoral pain syndrome, ACL injury, medial knee pain, and lower back pain.

*Hip abductor weakness is often accompanied by lower crossed syndrome – a larger pattern of biomechanical dysfunction involving weakness of the abdominal wall and hypertonicity in the hip flexors and paraspinal musculature. Evaluation should include a relatively global assessment of lumbopelvic muscle and joint function. Additionally, clinicians should assess for the presence of foot hyperpronation in patients with hip abductor weakness.


Referenced from:
ChiroUp.com “Hip Abductor Weakness Clinical Pearls

A Few Sleep Tips From Us To You

276

Your mattress and the position you sleep in may affect your spine.

Choose a mattress that provides medium or firm support, such as a traditional coil spring or adjustable airbed. Avoid waterbeds, thick pillow tops and soft, sagging mattresses.
Always sleep on your back with a pillow either underneath your knees or on your side with a pillow between your knees. Avoid sleeping on your stomach.
Keep your neck and back covered while sleeping to avoid drafts that could cause potential muscle spasms.

Here are a couple of tips to help you get in and out of bed more comfortably:
To lie down: Sit on the edge of the bed, pull your arms to your sides and tilt your body into the bed, maintaining the bend of your knees at 45 degrees. Finally, bring your feet into in a lying position or roll onto your back.
To get up: From a side-lying position with your knees bent, push your body upright into a sitting position, swinging your legs over the edge of the bed as you rise.

If you find that you wake up sore then you may be suffering from any number of conditions that get worse overnight.

Our Exercise Of The Month: ITB Foam Roller

ITB – Foam Roller
  • Lie on your side with your affected thigh over a foam roll.
  • Lift your shoulders off of the floor with your arm and roll the fleshy part your mid & lower thigh back and forth over the foam roller.
  • Avoid rolling over the bony point of your hip unless specifically directed.
  • Perform this exercise for one minute twice per day or as directed.

Hamstring Problems?

Glute Ham Raise.gif

A great injury prevention movement is the glute-ham raise. Done after a warm up and prior to competition it will significantly reduce the odds of hamstring strains in running athletes in sports like Soccer, Football and Sprinting.

To perform the movement:

Begin in a tall kneeling position on a cushion or pillow.

Partner grabs and holds ankles to ground or hook your feet under a stable surface.

Keeping your torso neutral and your thighs in line with your body, bend forward at the knees, using your hamstrings to control the speed of your forward bend.

Go as far as you can without cramping, pain or falling to the ground.


My Hip Hurts….

hip FAI

​Is it a labral tear? 

One of the structures that is frequently blamed for hip pain is called the labrum—the rubbery tissue that surrounds the socket helping to stabilize the hip joint. This tissue often wears and tears with age, but it can also be torn as a result of a trauma or sports-related injury.

The clinical significance of a labral tear of the hip is controversial, as these can be found in people who don’t have any pain at all. We know from studies of the intervertebral disks located in the lower back that disk herniation is often found in pain-free subjects—between 20-50% of the normal population.  In other words, the presence of abnormalities on an MRI is often poorly associated with patient symptoms, and the presence of a labral tear of the hip appears to be quite similar.

For instance, in a study of 45 volunteers (average age 38, range: 15–66 years old; 60% males) with no history of hip pain, symptoms, injury, or prior surgery, MRIs reviewed by three board-certified radiologists revealed a total of 73% of the hips had abnormalities, of which more than two-thirds were labral tears.

Another interesting study found an equal number of labral tears in a group of professional ballet dancers (both with and without hip pain) and in non-dancer control subjects of similar age and gender.

Another study showed that diagnostic blocks—a pain killer injected into the hip for diagnostic purposes to determine if it’s a pain generator—failed to offer relief for those with labral tears.

Doctors of chiropractic are trained to identify the origins of pain arising from the low back, pelvis, hip, and knee, all of which can mimic or produce hip symptoms.  Utilizing information derived from a careful history, examination, imaging (when appropriate), and functional tests, chiropractors can offer a nonsurgical, noninvasive, safe method of managing hip pain.

8 Safety Tips to Prevent Falls

8 tips

When the rain and snow starts to fall, so do people. In fact, falls are the leading cause of nonfatal injuries in adults 45 and older. Protect yourself from a life-changing injury this winter with these 8 safety tips.

1. Choose the right shoe. Shoes and boots need to fit properly and have soles with good traction. Snow boots or hiking boots will provide the best protection for the worst type of weather.

2. Leave early. Falls are more likely to happen when you’re in a rush. Allow yourself plenty of time to get to where you’re going.

3. Walk like a penguin. Take short steps and walk as flat-footed as possible on icy or slippery ground.

4. Keep your hands free. You’ll need them to help you balance, so avoid carrying heavy loads and keep those hands out of your pockets.

5. Remove snow and ice from walkways frequently. Don’t wait for it to melt. That could take awhile. Apply ice melt and ask for help if you need it.

6. Keep the lights on. If you have exterior lights on your home, use them to help see where you’re walking at night.

7. Advocate for your safety. If the entrances or sidewalks do not look safe outside of a business or a local venue, speak up and let someone know.

8. Keep your cell phone with you. Even if it’s just on a trip to the mailbox, bring it. In the event that a fall does occur, you may need it to call someone for help.


Stay vigilant and remember these tips during this winter season. If you are injured from a fall, count on our office to help get you back on your feet quickly.