The Bird Dog

Bird Dog

Today we are going to look at one of the most effective exercises to protect your lumbar spine from discogenic injury, the bird dog. A great way to work on both posterior chain and rotational stability, the bird dog is safe, effective and simple.

  • Get on your hands and knees (four point position) with your knees and hands, hip and shoulders width apart.
  • Your back is in neutral position (slightly arched) and your chin must be tucked in.
  • Activate your lower abdominals (transversus abdomini) by bringing your belly button inward and by activating your pelvic floor muscles 20 to 30% of maximal contraction.
  • Maintain a steady abdominal breathing while you simultaneously lift one leg backwards and the opposite arm overhead keeping your back in neutral position.
  • Return to the initial position and repeat with the other leg and arm.

2 sets of 10 reps as part of your regular core/stability routine will have you well on your way to a life-proof low back!

Image and instructions from physiotec.ca 

Trigger points in the pectoralis Major muscle.

The pectoralis major or “pecs” is commonly thought of as the chest muscle. It originates on the clavicle, sternum, costal cartilage , and the external oblique aponeurosis. It inserts on the intertubercular groove of the humerus. Its main actions are to adduct the shoulder and to internally rotate the humerus. This muscle gets chronically shortened by a rounded shoulder forward posture such as from prolonged sitting. Tightness in this muscle can cause strain in the rhomboids and traps. When trigger points form in this muscle they refer pain into the anterior shoulder, as well as the anterior chest and medial aspect of the arm. Trigger points in the pecs can also cause nipple hypersensitivity. Trigger points in the left pec muscle can mimic heart pain.

Trigger points in the rhomboid muscles.

This is another common muscle to get trigger points. It originates on the spinous processes of the T2-T5 vertebrae. It inserts on the medial border of the scapula. It’s main actions are to adduct the scapula pulling it back toward the spine, and to rotate the glenohumeral joint downward. This muscle also prevents wining of the scapula. This muscle is often overloaded by a sitting posture where the shoulders are rolled forward such as when using a computer. The Rhomboids are often weak and under trained in people. Trigger points in this muscle cause pain and ache in the upper back between the shoulder blade. Strength trading for this muscle is necessary to help prevent postural overload.

How can I calm down my WAD symptoms?

Cervical Strain

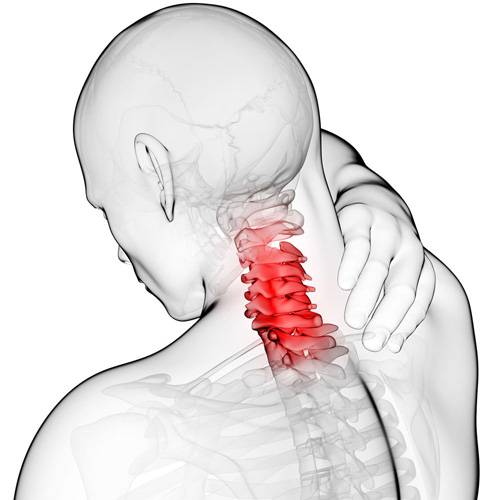
Whiplash is really a slang term for the rapid back and forth whipping of the head on the neck, usually associated with motor vehicle accidents. The title “Whiplash Associated Disorders”, or WAD, describes it best because it includes ALL of the MANY signs and symptoms of the disorder.

WAD basically comes in three sizes based on the degree of injury. A WAD I is present when there is pain but no physical examination findings; WAD II occurs when there are exam findings but no neurological loss (numbness or weakness); and WAD III includes loss of neurological function.  There is also a separate WAD level that includes fractures and dislocations (WAD IV).

There are many things that can be done by the patient to assist in the healing process for WAD. The first well-studied recommendation is to “continue with your usual activities.” Try to keep active and not change your routine. The good news is that WAD (especially types I and II) usually resolves without complication, and recovery is even more likely to occur if you don’t deviate much from your routine.

For those whose symptoms are more severe and/or not resolving, mobilization and manipulation of the neck and back are very effective treatment options. In addition to treatments you’d receive in a chiropractic office, there are MANY things you can do at home as “self-help strategies.” Some of these include (“PRICE”):

1)  PROTECT: Though it’s important to continue with your usual daily activities, this is dependent on both the degree of tissue injury and your pain tolerance. So do as many of your usual daily activities as possible, but AVOID those that result in a sharp, lancinating type of pain or those where recovery from the pain is delayed.  Therefore, this category may require modifying your ADLs (activities of daily living). A cervical collar (hard orsoft) should NOT to be used UNLESS you have an unstable injury (fracture or a grade III sprain).

2)  REST: Doing too much is like picking at a cut (which can delay healing) and doing too little can lead to a delayed healing response as well. Staying within reasonable pain boundaries is a good guide.

3) ICE > HEAT: Ice reduces swelling, and your doctor will typically recommend it over applying heat, especially on a recent injury. Heat draws fluids in, and while it may feel good, it can make your symptoms worse.

4)  COMPRESS: We can basically ignore this when referencing neck pain. This pertains better to wrapping an ankle, knee, wrist, or elbow with an elastic compression orthotic or brace.

5)  ELEVATE: This too is meant for the acute stages of an extremity injury like a foot or ankle.

Exercises unique for neck pain in the acute, subacute, and chronic stages of healing are perhaps the most important of the self-help approaches. In the ACUTE phase, try these…

1)  Range of Motion: Once again, stay within “reasonable pain boundaries” as you move your head forwards, backwards, side to side, and rotate left and right. These can be done either with or without LIGHT resistance applied using one or two fingers placed against your head. Limit the repetitions to three slow reps in each direction and emphasize the release of the movement.

2)  Chin/head Glides: Tuck in the chin (think of creating a double or triple chin) followed by poking the chin/head out.

In the SUBACUTE and CHRONIC phases of healing, the importance of strengthening the deep neck flexors cannot be over emphasized. Please refer to last week’s article for a description of this (see #3 of the 6 recommendations listed).

Trigger points in the trapezius muscle.

The trapezius muscle is a large diamond shaped muscle in you mid/upper back and neck. This muscle is one of the most common sites where trigger points can form. This muscle originates on the Nuchal ligament and the spinous processes of C6-T12. It inserts on the spine of the scapula, the acromion process, and the distal clavicle. The upper fibres elevate the shoulder and rotate the glenoid fossa (shoulder socket) upward. The lower fibres assist this motion as well as help depress the shoulder. The middle fibres of this muscle strongly adduct the scapula. This muscle is susceptible to postural overload such as sitting at desk all day. Trigger points on the lateral upper edge refer into the lateral neck and temples, causing “tension neck ache”as well as headache pain.Trigger points in the middle and lower fibres refer pain into the posterior neck and shoulder.

How long does Whiplash last?

watch

First, what is whiplash? It’s a lot of things, which is why the term WAD or Whiplash Associated Disorders has become the most common term for the main signs and symptoms associated with a whiplash injury. WAD is usually associated with a motor vehicle collision, but sports injuries, diving accidents, and falls are other common ways to sustain a WAD injury.

To answer the question of the month, in most cases, the recovery rate is high and favors those who resume their normal daily activities. The worse thing you can do when you sustain a WAD injury is to not do anything! Too much rest and inactivity leads to long-term disability. Of course, this must be balanced with the degree of injury, but even when the injury requires some “down time,” stay as active as possible during the healing phase.

Many people recover within a few days or weeks while a smaller percentage require months and about 10% may only partially recover. So what can be done to give you the best possible chance to fully recover as soon as possible?

During recovery, you can expect your condition to fluctuate in intensity so “listen” to your body, let it “guide” you during activity and exercise, and stay within “a reasonable boundary of pain” during your activity. Remember, your best chance for full recovery FAVORS continuing a normal lifestyle. Make reasonable modifications so you can work, socialize, and do your “normal” activities!

The KEY: Stay in control of your condition – DO NOT let it control you! Here are some tips:

1)  POSTURE CONTROL: Keep the weight of the head back by gliding your chin back until you “hit” a firm end-point. Then release it slightly so it’s comfortable—this is your NEW head position!

2)  FLEXIBILITY: Try this range of motion (ROM) exercise… Slowly flex your neck forwards and then backwards, then bend your neck to the left and then the right, and then rotate it to the left and to then to the right. THINK about each motion and avoid sharp, knife-like pain; a “good-hurt” is okay! Next, do the same thing with light (one-finger) resistance in BOTH directions. Try three slow reps four to six times a day!

3)  MUSCLE STRENGTH: Try pushing your head gently into your hand in the six directions listed above to provide a little resistance. Next, reach back with both hands or wrap a towel around your neck and pull forwards on the towel while you push the middle of your neck backwards into the towel doing the chin-tuck/glide maneuver (same as #1). Repeat three to five times slowly pushing, and more importantly, release the push slower! This is the MOST IMPORTANT of the strengthening exercises in most cases! Next, “squeeze” your shoulder blades together followed by spreading them as far apart as possible (repeat three to five times).

4)  PERIODIC BREAKS: Set a timer to remind yourself to do a stretch, get up and move, to tuck your chin inwards (#1) and do some of #2 and #3 every 30-60 minutes.

5)  LIFTING/CARRYING/WORK: Be SMART! Do not re-injure yourself. Change the way you handle yourself in your job, in the house, and while performing recreational activities.

6)  HOUSEHOLD ACTIVITIES: Use a dolly to move boxes and keep commonly used items within easy reach (not too high or low).

Be smart, stay educated, work within the range your body tells you is “safe” and most importantly, STAY IN CONTROL!!!

Lifting Mechanics Made Simple

boxes

Here are some tips to help you lift safely:
Avoid lifting or flexing before you’ve had the chance to warm up your muscles (especially when you first awaken or after sitting or stooping for a period of time).
To lift, stand close directly facing object with your feet shoulder width apart.
Squat down by bending with your knees, not your back. Imagine a fluorescent light tube strapped to your head and hips when bending. Don’t “break” the tube with improper movements. Tuck your chin to help keep your spine aligned.
Slowly lift by thrusting your hips forward while straightening your legs.
Keep the object close to your body, within your powerzone” between your hips and chest. Do not twist your body, if you must turn while carrying an object, reposition your feet, not your torso.

An alternative lifting technique for smaller objects is the golfers lift. Swing one leg directly behind you. Keep your back straight while your body leans forward. Placing one hand on your thigh or a sturdy object may help.

LIFTING-5.png

Trigger points in the Levator scapula

The Levator scapula is a muscle in your neck that originates on the transverse processes of C1-C4 and inserts on the superior part of the medial border of the scapula. The primary actions of this muscle are to elevate the scapula and rotate the glenoid fossa downward. It also rotates the neck to the same side and assists in extension. When this muscle is tight it restricts neck rotation resulting in the classic “stiff neck”. With a forward head position the Levator is often stretched and over worked. To help combat this you must get the head back by releasing the anterior chest and neck muscles. Trigger points in this muscle refer pain into the angle of the neck and down the shoulder blade.

Hip Abductor Weakness

Hip Abduction

* The gluteus medius contributes approximately 70% of the abduction force required to maintain pelvic leveling during single leg stance.

* Hip abductor strength is the single greatest contributor to lower extremity frontal plain alignment during activity.

* There is no “typical” presentation for hip abductor weakness, but the problem must be considered in any patient with lower chain symptomatology, particularly those with hip tendinopathy, greater trochanteric pain syndrome, iliotibial band syndrome, patellofemoral pain syndrome, ACL injury, medial knee pain, and lower back pain.

*Hip abductor weakness is often accompanied by lower crossed syndrome – a larger pattern of biomechanical dysfunction involving weakness of the abdominal wall and hypertonicity in the hip flexors and paraspinal musculature. Evaluation should include a relatively global assessment of lumbopelvic muscle and joint function. Additionally, clinicians should assess for the presence of foot hyperpronation in patients with hip abductor weakness.


Referenced from:
ChiroUp.com “Hip Abductor Weakness Clinical Pearls

A Few Sleep Tips From Us To You

276

Your mattress and the position you sleep in may affect your spine.

Choose a mattress that provides medium or firm support, such as a traditional coil spring or adjustable airbed. Avoid waterbeds, thick pillow tops and soft, sagging mattresses.
Always sleep on your back with a pillow either underneath your knees or on your side with a pillow between your knees. Avoid sleeping on your stomach.
Keep your neck and back covered while sleeping to avoid drafts that could cause potential muscle spasms.

Here are a couple of tips to help you get in and out of bed more comfortably:
To lie down: Sit on the edge of the bed, pull your arms to your sides and tilt your body into the bed, maintaining the bend of your knees at 45 degrees. Finally, bring your feet into in a lying position or roll onto your back.
To get up: From a side-lying position with your knees bent, push your body upright into a sitting position, swinging your legs over the edge of the bed as you rise.

If you find that you wake up sore then you may be suffering from any number of conditions that get worse overnight.